Indications for the Clinical Use of Composite Materials
A 34-year-old male presented for routine direct restorative dentistry in the mandibular right quadrant (Figure 1). Tooth No. 29 presented with radiographic decay on the distal surface associated with a minor marginal ridge fracture. Tooth No. 30 presented with a small occlusal direct composite with marginal recurrent decay in the lingual groove between the respective cusps. Tooth No. 31 presented with a direct occlusal composite with a large marginal opening in the distolingual area. The treatment plan was to conservatively remove the existing restorative material and recurrent decay and to assess the restorative needs of each tooth.
A number of choices regarding the generation of bonding agents (“total etch” versus “self etch”) and types of composite materials (flowable, bulk fill flowables, nano–micro hybrids, etc) are available, so indications for clinical use are not always routine, or agreed upon by all clinicians and researchers. In this case report, the author will discuss some of the materials’ uses and his opinions on their indications.
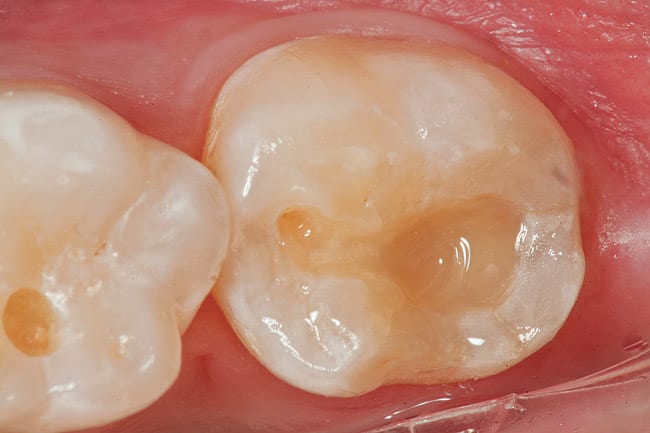
Figure 2 shows an occlusal view after tooth preparation is complete. All cavosurface margins were in the enamel. The depth of dentin penetration varied in each of the three preparations. Histologically, dentin closer to the dentin–enamel junction has fewer dentinal tubules per square millimeter and more peritubular dentin. Therefore, when etched, there is more micromechanical surface area between tubules to bond to (demineralized dentin). There are also fewer dentinal tubules that—when etched, removing smear plugs—are opened. Deeper preparations (deep dentin, including deep Class V preparations) have more tubules per square millimeter and less available peritubular dentin. Therefore, overetching in deeper preparations may lead to postoperative sensitivity. Because self-etching dentin adhesives are less aggressive—the smear layer is dissolved and the debris incorporated in the adhesive—there may be less potential for postoperative sensitivity when used in deeper preparations.1
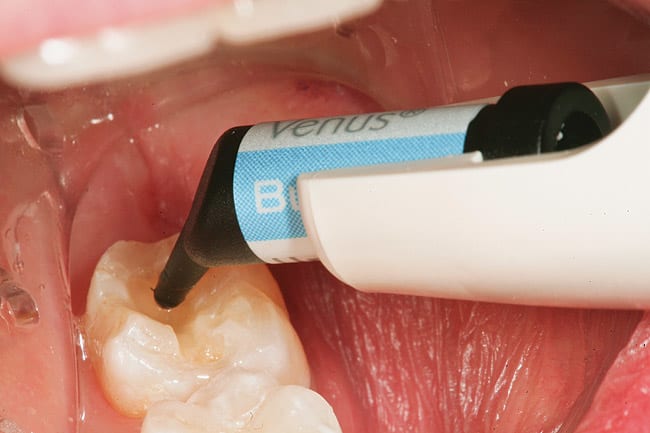
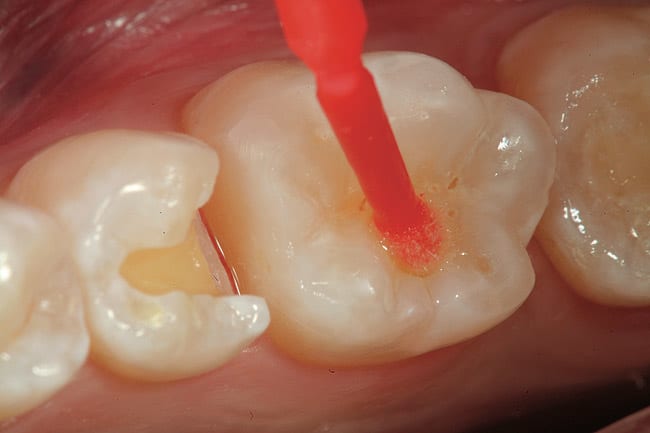
After isolation using an Isolite™ (Isolite Systems, https://www.isolitesystems.com), tooth No. 31 was restored first. Due to the preparation depth, a self-etching bonding agent (iBond® Self Etch, Heraeus Kulzer, https://www.heraeus-dental-us.com) was used as the adhesive. A phosphoric etch was used on the enamel only for 15 seconds (Figure 3), and then rinsed off with water spray for an additional 15 seconds. This “selective etch” technique gives the clinician and patient the “best of both worlds”—an excellent enamel seal and a bond to dentin with less chance for postoperative sensitivity.2 After excess moisture was removed by placing a high volume suction to within 2 mm of the preparation for 2 seconds, the dentin and enamel surfaces were copiously covered with a self-etching adhesive (iBond Self Etch) using a microbrush with an agitating motion (Figure 4 ). After light curing for 20 seconds, a bulk fill flowable composite (Venus® Bulk Flow, Heraeus Kulzer) was employed to fill the deep preparation to a position just apical to the dentin–enamel junction (Figure 5). Venus Bulk Flow is suitable for bulk fill dentin replacement up to 4 mm in depth. Figure 6 shows the bulk-filled flowable layer after light curing. Note that an oxygen-inhibited layer was present to make the surface tacky; therefore it was easier to pack the remaining layer of nano–micro hybrid composite material (Venus Diamond Flow, Heraeus Kulzer) without “pullback” from the composite placement instrument potentially creating voids between the layers. A Mini 4 Goldstein Flexi-Thin (Hu-Friedy, https://www.hu-friedy.com) was used to sculpt the nano–micro hybrid layer to proper occlusal form (Figure 7).
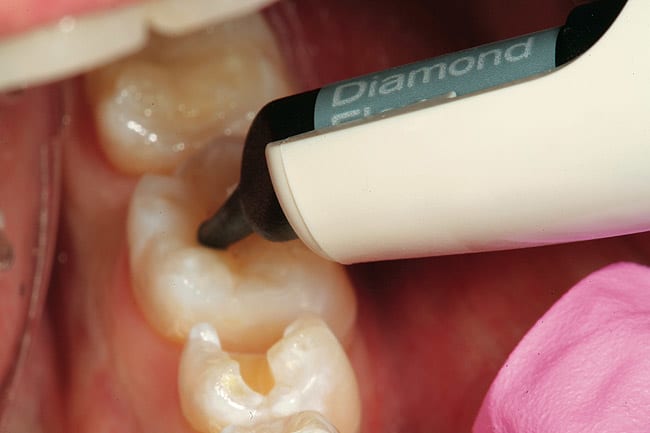
Next, the small occlusal pit preparation in tooth No. 30 was barely into the dentin. A total-etch technique was chosen for this restoration. The enamel and dentin were etched for 15 seconds using a 37% phosphoric etch. After rinsing for 15 seconds, the preparation was thoroughly air-dried. Because this would desiccate the etched dentin surface, the dentin was rewetted using a dentin desensitizer (Gluma®, Heraeus Kulzer). As the desensitizer is 80% water, the collapsed collagen was rehydrated, and desensitization was obtained by occlusion of the dentinal tubules. After the excess desensitizer was removed using high-evacuation suction, a total-etch dentin adhesive (iBond Total Etch) was placed with a microbrush (Figure 8 ). The preparation surface was saturated with the adhesive, air-thinned, and light-cured for 20 seconds. Because this preparation was very conservative and had no opposing tooth contact, a flowable composite (Venus Diamond Flow) was used for the entire restoration (Figure 9 ).
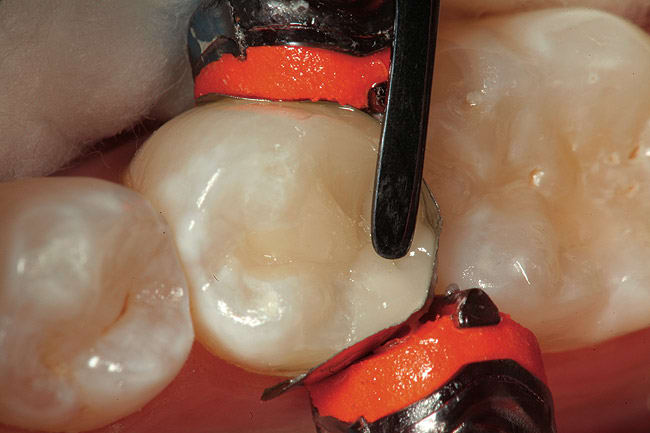
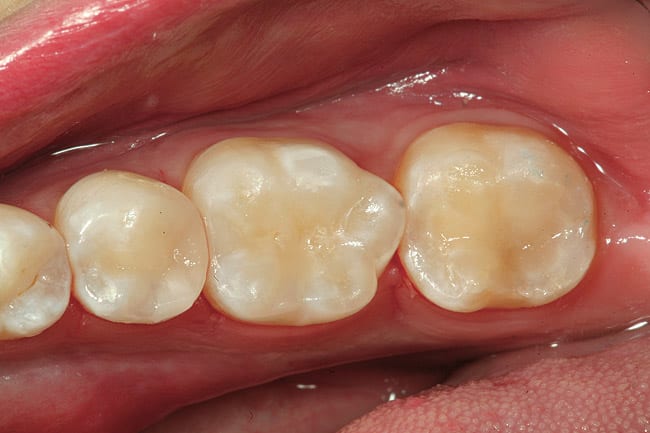
Finally, the disto-occlusal restoration on tooth No. 29 had a sectional matrix and wedge placed (Composi-Tight 3D®, Garrison Dental Solutions, https://www.garrisondental.com). Then, all enamel and dentin was etched for 15 seconds (total etch). Again, the preparation was very conservative regarding depth, so the total-etch technique was selected. After rinsing for 15 seconds and thorough air drying, the dentin was rewetted using a dentin desensitizer and the excess removed with high-volume suction. After saturating the enamel and dentin surface, agitating the bonding agent, and scrubbing the preparation surface, the adhesive was air-thinned, then light-cured for at least 20 seconds. The first layer of composite was flowable resin (Venus Diamond Flow), placed at a thickness of no more than 0.5 mm. Due to the viscosity of flowable composite, all minute intricacies of the internal aspect of the preparation are uniformly covered, leaving less chance for voids between composite and adhesive layers. In a Class II cavity preparation, covering the enamel on the gingival margin ensures complete marginal seal (Figure 10 ). The final sculpted layer was created using the Venus Diamond nano–micro hybrid composite (Figure 11 ). After removal of the Isolite, the occlusion was checked with articulation paper and any adjustments were made using a 30-µm diamond composite finishing bur on a high-speed handpiece (Stylus™ ATC, DENTSPLY Midwest, https://www.dentsply.com) (Figure 12). Next, composite finishing abrasives (Venus Supra, Heraeus Kulzer) were used to polish the composite surface (Figure 13). After cleaning the surface of the restorations for 2 seconds with 37% phosphoric etch, the restorations were rinsed and dried thoroughly. An application of surface sealant (Seal-n-Shine™, Pulpdent, https://www.pulpdent.com) was made with a microbrush, air-thinned, and light-cured. The completed restorations are shown in Figure 14.
Conclusion
This article has described a number of options, both in adhesives and materials, for direct composite restorations. Both total-etch and self-etch adhesive systems can be used to restore posterior teeth with composite resin. The purpose of demonstrating both total- and self-etch techniques was to show options and describe clinical scenarios which best fit each technique. Bulk fill flowable resins, such as Venus Bulk Flow, offer the clinician an excellent choice to quickly make larger, deep cavities smaller without using laborious and time-consuming layering techniques. Flowable resins in general make good cavity liners and can be used for very small restorations as well, as long as they are not in occlusal stress-bearing areas.3-9
References
1. Jackson R. The importance of technique in preventing postoperative sensitivity when placing bonded restorations. Dent Today. 1999;18(9):44-49.
2. Margeas R. Be selective. Create esthetic restorations using the selective etch technique and an advanced nano composite. Dental Products Report. 2010;44(6):64-66.
3. He Z, Shimada Y, Sadr A, et al. The effects of cavity size and filling method on the bonding to Class I cavities. J Adhes Dent. 2008;10(6):447-453.
4. Nayif MM, Nakajima M, Foxton RM, et al. Bond strength and ultimate tensile strength of resin composite filled into dentine cavity; effect of bulk and incremental filling technique. J Dent. 2008;36(3):228-234.
5. Pereira RA, Araujo PA, Castañeda-Espinosa JC, et al. Comparative analysis of the shrinkage stress of composite resins. J Appl Oral Sci. 2008;16(1):30-34.
6. Ilie N, Kunzelmann KH, Visvanathan A, et al. Curing behavior of a nanocomposite as a function of polymerization procedure. Dent Mater J. 2005;24(4):469-477.
7. Gerdolle DA, Mortier E, Droz D. Microleakage and polymerization shrinkage of various polymer restorative materials. J Dent Child (Chic). 2008;75(2):125-133.
8. Lopes LG, Franco EB, Pereira JC, et al. Effect of light-curing units and activation mode on polymerization shrinkage and shrinkage stress of composite resins. J Appl Oral Sci. 2008;16(1):35-42.
9. Ilie N, Hickel R. Quality of curing in relation to hardness, degree of cure and polymerization depth measured on a nano-hybrid composite. Am J Dent. 2007;20(4):263-268.
About the Author
By Robert A. Lowe, DDS
Private Practice, Charlotte
North Carolina


